
Before starting with this guide, first read the introduction: “Coral and Nvidia Passthrough for Proxmox LXC made easy!“. In the refferred and previously posted Guide, the Nvidia and Coral drivers are installed and PCI and USB passthrough is configured to pass the GPU and TPU deviced straight to your LXC Container for maximum performance!
In this guide, I’ll walk you through the steps to install Frigate in a Proxmox LXC container, leveraging an Nvidia GPU for enhanced performance. We’ll cover Nvidia driver installation, Docker setup, and Docker Compose configuration for Frigate.
This post may contain affiliate links which means I receive a commission for purchases made through links. I only recommend products that I personally use! Learn more on my private policy page.
Step 1: Install the Nvidia Driver in the LXC container as well
In the previous Guide, we manually installed the Nvidia Drivers on the Proxmos Host. Now we will login into the LXC Container using ssh to install exactly the same driver.
ssh [username]@[IP_of_LXC_host]
Now we are ready to install the Nvidia driver without the kernel modules. We use the kernel modules from the Proxmox host.
wget https://download.nvidia.com/XFree86/Linux-x86_64/550.78/NVIDIA-Linux-x86_64-550.78.run
chmod +x NVIDIA-Linux-x86_64-550.78.run
sudo ./NVIDIA-Linux-x86_64-550.78.run --no-kernel-module
Verify the Nvidia Driver in the LXC Container:
ls -alh /dev/nvidia*
nvidia-smi
The output will be like:
-rwxr-xr-x 1 root root        0 May 23 18:41 /dev/nvidia-caps
crw-rw-rw- 1 root root 195, 254 May 20 00:25 /dev/nvidia-modeset
crw-rw-rw- 1 root root 510,   0 May 20 00:25 /dev/nvidia-uvm
crw-rw-rw- 1 root root 510,   1 May 20 00:25 /dev/nvidia-uvm-tools
crw-rw-rw- 1 root root 195,   0 May 20 00:25 /dev/nvidia0
crw-rw-rw- 1 root root 195,   1 May 23 18:41 /dev/nvidia1
crw-rw-rw- 1 root root 195, 255 May 20 00:25 /dev/nvidiactlSun May 26 10:56:26 2024
+-----------------------------------------------------------------------------------------+
| NVIDIA-SMI 550.78 Driver Version: 550.78 CUDA Version: 12.4 |
|-----------------------------------------+------------------------+----------------------+
| GPU Name Persistence-M | Bus-Id Disp.A | Volatile Uncorr. ECC |
| Fan Temp Perf Pwr:Usage/Cap | Memory-Usage | GPU-Util Compute M. |
| | | MIG M. |
|=========================================+========================+======================|
| 0 NVIDIA GeForce RTX 2060 Off | 00000000:09:00.0 Off | N/A |
| 57% 58C P2 45W / 170W | 794MiB / 6144MiB | 3% Default |
| | | N/A |
+-----------------------------------------+------------------------+----------------------+
+-----------------------------------------------------------------------------------------+
| Processes: |
| GPU GI CI PID Type Process name GPU Memory |
| ID ID Usage |
|=========================================================================================|
+-----------------------------------------------------------------------------------------+
With the Nvidia driver running we are ready to setup Docker
Setting Up Docker and Docker Compose
Remove Existing Docker Packages:
apt remove docker-compose docker docker.io containerd runc
Install Docker from the Official Repository:
apt update apt install ca-certificates curl gnupg lsb-release curl -fsSL https://download.docker.com/linux/debian/gpg | gpg --dearmor -o /usr/share/keyrings/docker-archive-keyring.gpg echo \ "deb [arch=$(dpkg --print-architecture) signed-by=/usr/share/keyrings/docker-archive-keyring.gpg] https://download.docker.com/linux/debian \ $(lsb_release -cs) stable" | tee /etc/apt/sources.list.d/docker.list > /dev/null apt update apt install docker-ce docker-ce-cli containerd.io
Install Docker Compose:
curl -L "https://github.com/docker/compose/releases/download/1.29.2/docker-compose-$(uname -s)-$(uname -m)" -o /usr/local/bin/docker-compose chmod +x /usr/local/bin/docker-compose
Test Docker with GPU Support:
docker run --rm --gpus all nvidia/cuda:11.8.0-devel-ubuntu22.04 nvidia-smi
The output should look like this:
==========
== CUDA ==
==========
CUDA Version 11.8.0
Container image Copyright (c) 2016-2022, NVIDIA CORPORATION & AFFILIATES. All rights reserved.
This container image and its contents are governed by the NVIDIA Deep Learning Container License.
By pulling and using the container, you accept the terms and conditions of this license:
https://developer.nvidia.com/ngc/nvidia-deep-learning-container-license
A copy of this license is made available in this container at /NGC-DL-CONTAINER-LICENSE for your convenience.
Sun May 26 19:36:13 2024
+-----------------------------------------------------------------------------------------+
| NVIDIA-SMI 550.78                 Driver Version: 550.78         CUDA Version: 12.4     |
|-----------------------------------------+------------------------+----------------------+
| GPU  Name                 Persistence-M | Bus-Id          Disp.A | Volatile Uncorr. ECC |
| Fan  Temp   Perf          Pwr:Usage/Cap |           Memory-Usage | GPU-Util  Compute M. |
|                                         |                        |               MIG M. |
|=========================================+========================+======================|
|   0  NVIDIA GeForce RTX 2060        Off |   00000000:09:00.0 Off |                  N/A |
| 57%   58C    P2             44W /  170W |     794MiB /   6144MiB |      3%      Default |
|                                         |                        |                  N/A |
+-----------------------------------------+------------------------+----------------------+
+-----------------------------------------------------------------------------------------+
| Processes:                                                                              |
|  GPU   GI   CI        PID   Type   Process name                              GPU Memory |
|        ID   ID                                                               Usage      |
|=========================================================================================|
+-----------------------------------------------------------------------------------------+
Step 2: Setting Up Frigate with Docker Compose
Create a Directory for Frigate Configuration:
mkdir -p /opt/frigate/config cd /opt/frigate
Create the ‘docker-compose.yml’ File:
nano docker-compose.yml
Example docker-compose.yml:
version: '3.9'
services:
  frigate:
    container_name: frigate
    runtime: nvidia
    privileged: false # this may not be necessary for all setups
    restart: unless-stopped
    image: ghcr.io/blakeblackshear/frigate:stable
    deploy:
      resources:
        reservations:
          devices:
            - driver: nvidia
              count: 1 # number of GPUs
              capabilities: [gpu]
    shm_size: '220mb'
    devices:
      - /dev/bus/usb:/dev/bus/usb
    volumes:
      - /var/run/docker.sock:/var/run/docker.sock
      - /etc/localtime:/etc/localtime:ro
      - ./config/frigate.yml:/config/config.yml
      - /dev/dri:/dev/dri
      - /usr/lib/x86_64-linux-gnu/dri
      - /mnt/footage/Frigate:/media/frigate
      - type: tmpfs # Optional: 1GB of memory, reduces SSD/SD Card wear
        target: /tmp/cache
        tmpfs:
          size: 1000000000
      - ./config:/config
    ports:
      - "5000:5000"
      - "1935:1935"
      - "8554:8554"
      - "8555:8555/tcp"
      - "8555:8555/udp"
    environment:
      - NVIDIA_DRIVER_CAPABILITIES=compute,video,utility
      - NVIDIA_VISIBLE_DEVICES=all
Explanation: Each section of the docker-compose.yml file configures a specific aspect of the Frigate service. Adjust the paths and device mappings according to your hardware and directory structure.“
Run Docker Compose:
sudo docker-compose -f docker-compose.yml down # only for re-installations
sudo docker-compose -f docker-compose.yml pull
sudo docker-compose -f docker-compose.yml up -d
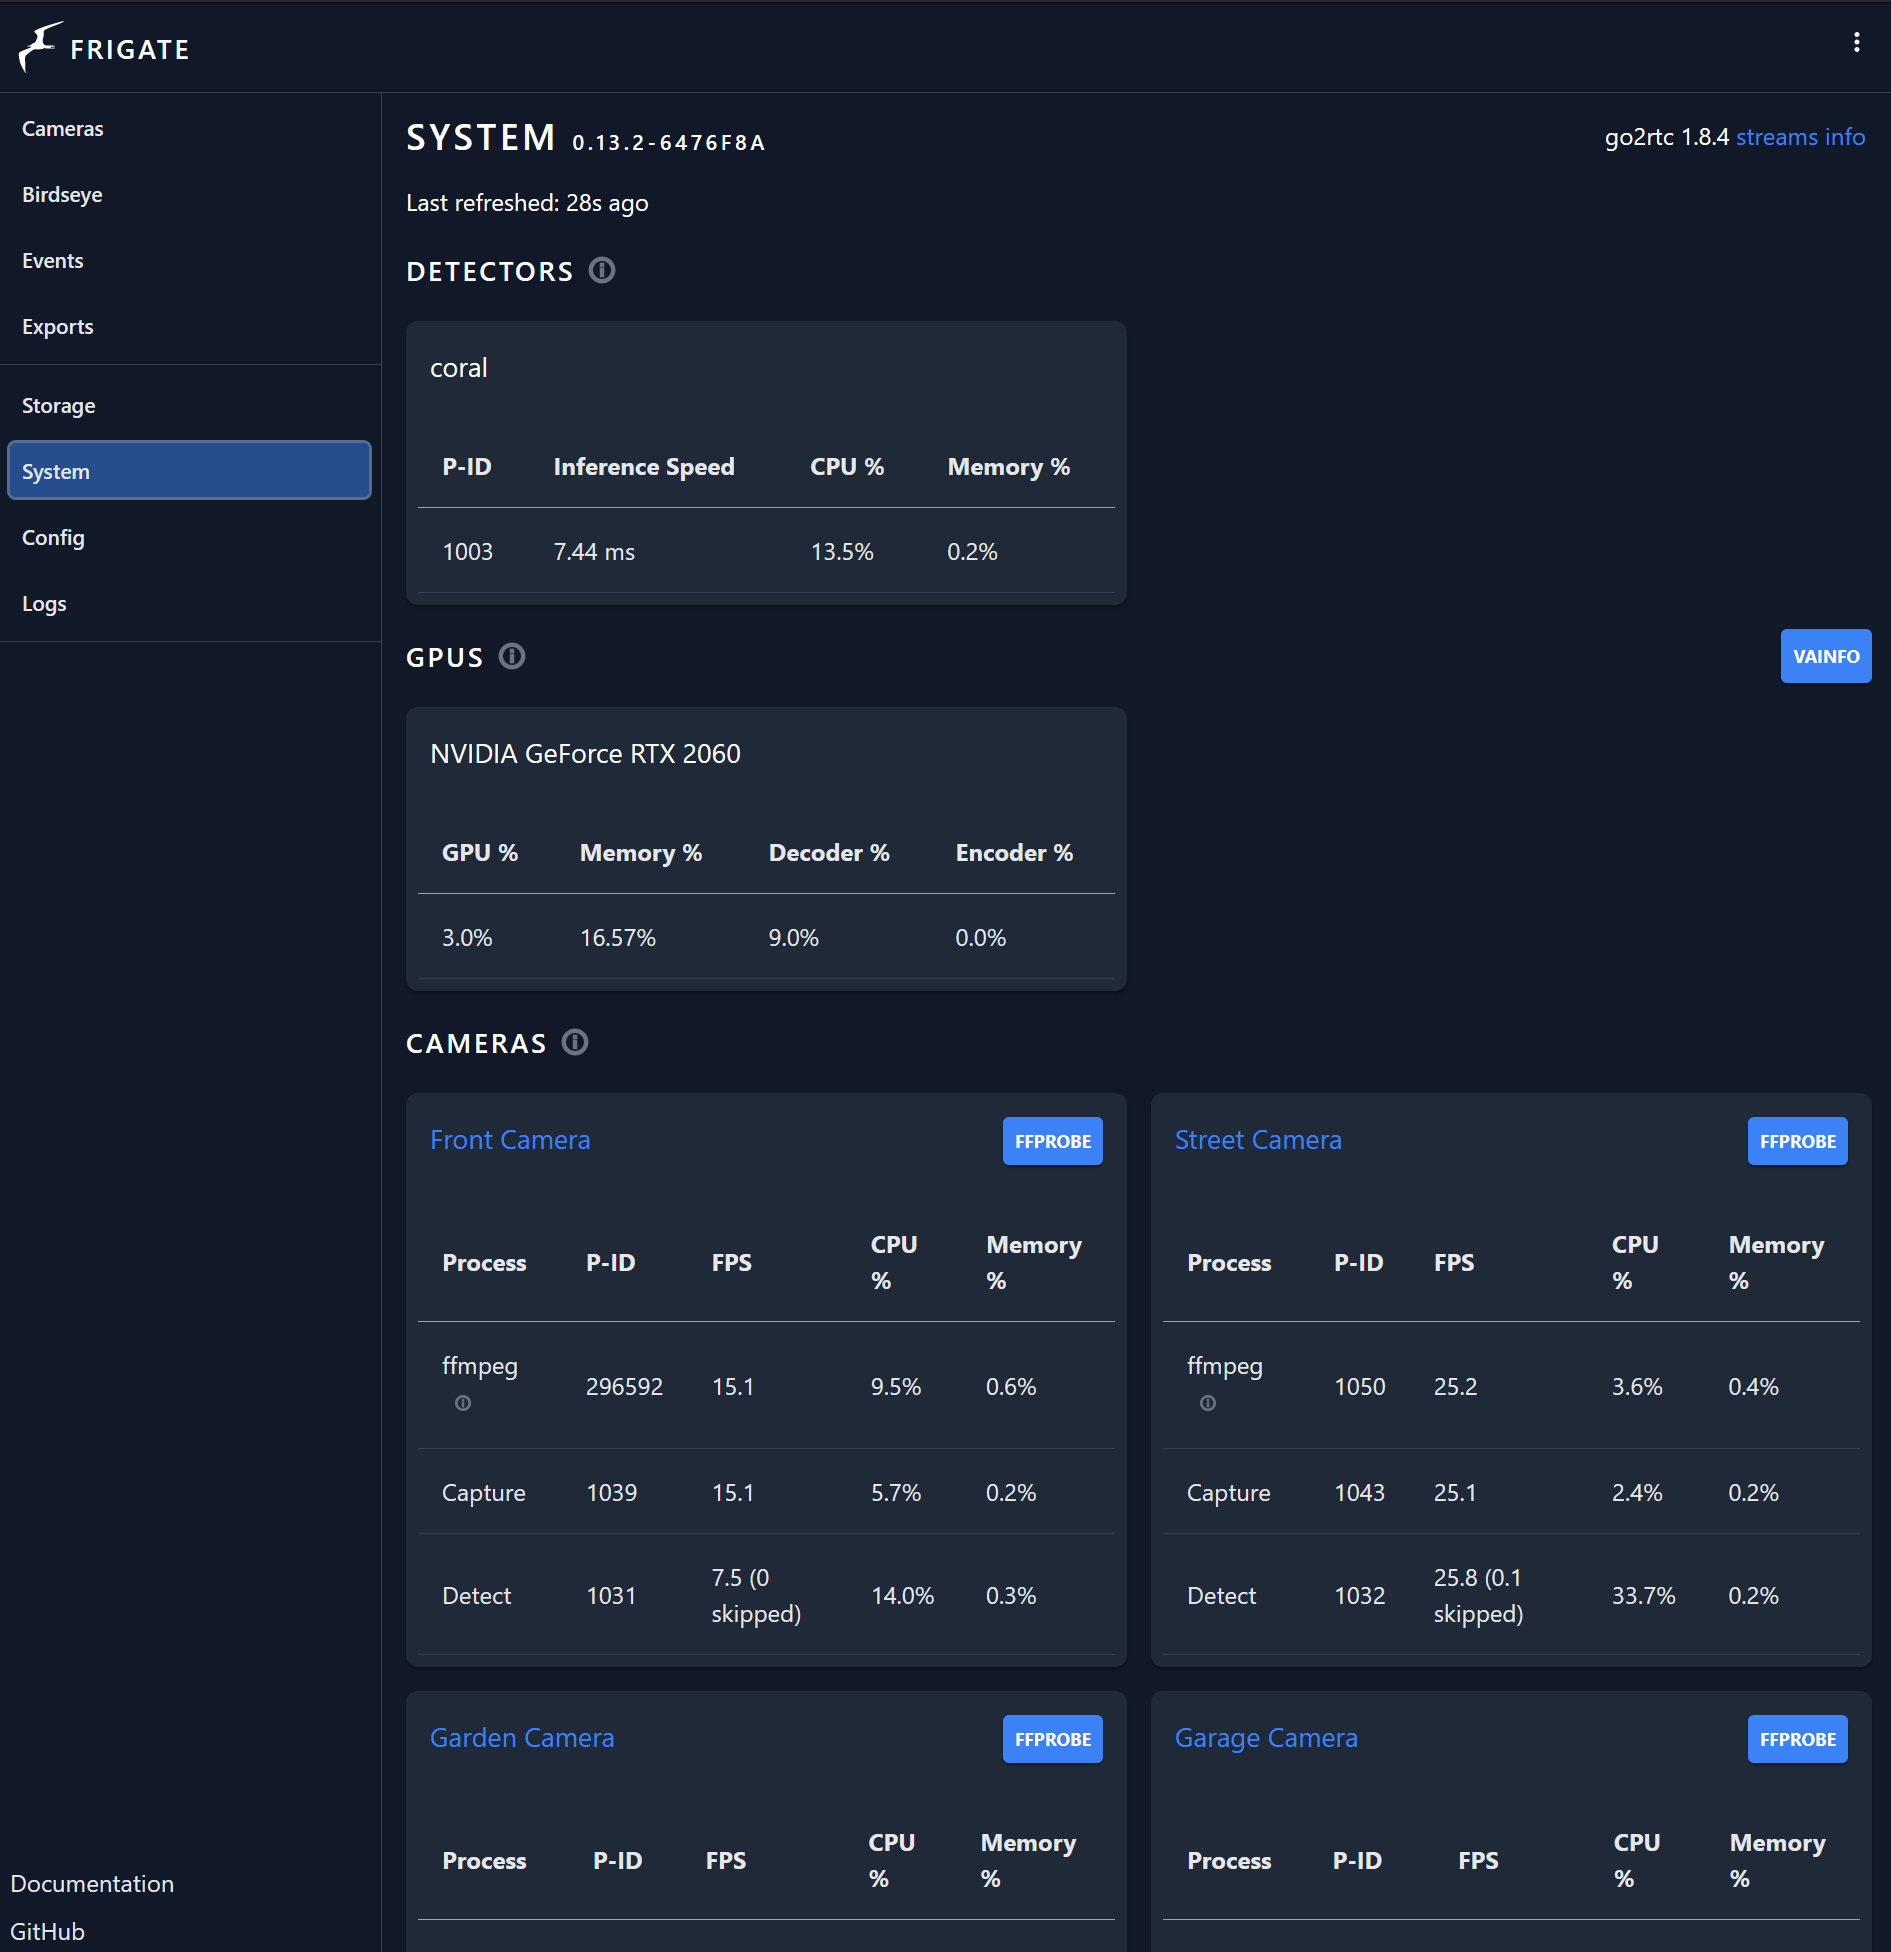
Frigate should now run with GPU and TPU support. At my system with a Google Coral TPU and a NVIDIA GeForce RTX 2060 GPU.
Check Frigate GUI in your browser:
http://<IP of your LXC host>:5000
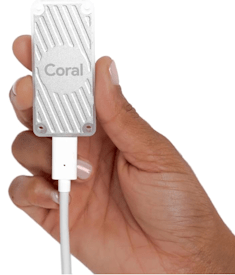
Price Range of the Google Coral USB stick in the Netherlands
In the Netherlands, the Google Coral USB TPU typically sells for around €60 to €80. While this may seem steep, the performance boost and energy efficiency it provides make it a worthwhile investment for any serious home lab enthusiast or AI developer. If you want to support me, and you are from the Netherlands, please buy via this link (Google Coral TPU on Amazon.nl) from Amazon.nl.
Conclusion
Following these steps, you’ve successfully set up Frigate in a Proxmox LXC container with Nvidia GPU and Coral TPU support using Docker and Docker Compose. This setup enhances Frigate’s performance by leveraging GPU and TPU acceleration for real-time AI object detection. Enjoy your optimized video surveillance system!


Thank you for the writeup! I went through it, but didn’t get all to the end..
The startup of Frigate doesn’t get through:
frigate | s6-rc: info: service log-prepare: starting
frigate | Generating the following TRT Models: yolov7-320
frigate | Downloading yolo weights
frigate | s6-rc: info: service log-prepare successfully started
frigate | s6-rc: info: service nginx-log: starting
frigate | s6-rc: info: service go2rtc-log: starting
frigate | s6-rc: info: service frigate-log: starting
frigate |
frigate | Creating yolov7-320.cfg and yolov7-320.weights
frigate | s6-rc: info: service nginx-log successfully started
frigate | s6-rc: info: service go2rtc-log successfully started
frigate | s6-rc: info: service go2rtc: starting
frigate | s6-rc: info: service frigate-log successfully started
frigate |
frigate | Done.
frigate | s6-rc: info: service go2rtc successfully started
frigate | s6-rc: info: service go2rtc-healthcheck: starting
frigate | 2024-07-29 11:34:58.074423748 [INFO] Preparing new go2rtc config…
frigate | s6-rc: info: service go2rtc-healthcheck successfully started
frigate | 2024-07-29 11:34:58.474491081 [INFO] Starting go2rtc…
frigate | 2024-07-29 11:34:58.595709114 11:34:58.595 INF go2rtc version 1.8.4 linux/amd64
frigate | 2024-07-29 11:34:58.596478477 11:34:58.596 INF [rtsp] listen addr=:8554
frigate | 2024-07-29 11:34:58.596870847 11:34:58.596 INF [webrtc] listen addr=:8555
frigate | 2024-07-29 11:34:58.597529231 11:34:58.597 INF [api] listen addr=:1984
frigate |
frigate | Generating yolov7-320.trt. This may take a few minutes.
frigate |
frigate | Traceback (most recent call last):
frigate | File “/usr/local/src/tensorrt_demos/yolo/onnx_to_tensorrt.py”, line 214, in
frigate | main()
frigate | File “/usr/local/src/tensorrt_demos/yolo/onnx_to_tensorrt.py”, line 202, in main
frigate | engine = build_engine(
frigate | File “/usr/local/src/tensorrt_demos/yolo/onnx_to_tensorrt.py”, line 112, in build_engine
frigate | with trt.Builder(TRT_LOGGER) as builder, builder.create_network(*EXPLICIT_BATCH) as network, trt.OnnxParser(network, TRT_LOGGER) as parser:
frigate | TypeError: pybind11::init(): factory function returned nullptr
frigate | [07/29/2024-11:35:04] [TRT] [W] Unable to determine GPU memory usage
frigate | [07/29/2024-11:35:04] [TRT] [W] Unable to determine GPU memory usage
frigate | [07/29/2024-11:35:04] [TRT] [W] CUDA initialization failure with error: 3. Please check your CUDA installation: http://docs.nvidia.com/cuda/cuda-installation-guide-linux/index.html
frigate | Loading the ONNX file…
frigate | Available tensorrt models:
frigate | ls: cannot access ‘*.trt’: No such file or directory
frigate | s6-rc: warning: unable to start service trt-model-prepare: command exited 2
NVidia Graphic seems to be accessible inside, is there a package missing for Cuda somewhere?
user@Frigate:~$ docker exec frigate nvidia-smi
Mon Jul 29 11:42:25 2024
+—————————————————————————————+
| NVIDIA-SMI 535.129.03 Driver Version: 535.129.03 CUDA Version: 12.2 |
|—————————————–+———————-+———————-+
| GPU Name Persistence-M | Bus-Id Disp.A | Volatile Uncorr. ECC |
| Fan Temp Perf Pwr:Usage/Cap | Memory-Usage | GPU-Util Compute M. |
| | | MIG M. |
|=========================================+======================+======================|
| 0 Quadro P1000 Off | 00000000:9E:00.0 Off | N/A |
| 34% 35C P8 N/A / N/A | 20MiB / 4096MiB | 0% Default |
| | | N/A |
+—————————————–+———————-+———————-+
+—————————————————————————————+
| Processes: |
| GPU GI CI PID Type Process name GPU Memory |
| ID ID Usage |
|=======================================================================================|
| No running processes found |
+—————————————————————————————+
Do you have any suggestions?
Thank you!
Hi Kai,
Thank you for your detailed question and for trying out the setup! I’m sorry you’re running into some issues. Based on the error messages you provided, it seems like the problem may be related to CUDA or TensorRT. Here are a few steps you can follow to troubleshoot the issue:
Verify CUDA Installation:
It looks like there might be an issue with the CUDA installation. Please double-check that CUDA is properly installed and recognized within the Docker container. You can do this by running:
docker exec frigate nvidia-smiIf CUDA is not correctly installed, you may need to follow the CUDA installation guide to resolve this.
Ensure TensorRT Compatibility:
The error you’re seeing (TypeError: pybind11::init(): factory function returned nullptr) could be due to a mismatch between TensorRT, CUDA, or the model you’re using. Please make sure that the version of TensorRT installed is compatible with your CUDA version. You can install the necessary TensorRT Python packages by running:
docker exec -it frigate bashpip install nvidia-pyindex
pip install nvidia-tensorrt
Check Your ONNX Model and Conversion Script:
It’s possible that the issue lies with the ONNX model or the conversion script. Please ensure that your ONNX model (yolov7-320.onnx) is valid and compatible with TensorRT. You might want to test the model outside of the Docker container to confirm it works correctly.
Review GPU Memory and Resource Availability:
The error related to GPU memory usage suggests that the model might be too large for the available GPU memory. You could try using a smaller YOLO model to see if that resolves the issue.
Examine Detailed Logs:
To get more insight into where the conversion is failing, you might want to run the Docker container in debug mode and check the logs:
docker logs frigate --followRebuild the Docker Container:
Rebuilding the Docker container can sometimes resolve issues caused by outdated packages. You can do this with the following commands:
docker-compose downdocker-compose build
docker-compose up -d
Check NVIDIA Container Toolkit:
Lastly, make sure the NVIDIA Container Toolkit is properly installed and configured on your host system, as it’s crucial for passing GPU resources to the Docker container. You can check this by running:
sudo apt-get install -y nvidia-container-toolkitsudo systemctl restart docker
Please give these steps a try and let me know if you still encounter any issues. I’m here to help!