
Proxmox VM Creation and Setup
- Create a new VM in Proxmox with sufficient CPU, memory, and disk resources.
- Set the CPU hardware type to “host” for optimal performance.
Setting the CPU hardware type to “host” for the virtual machine in Proxmox is crucial for optimal performance. This configuration allows the VM to use all the features of the host CPU, ensuring better compatibility and efficiency. In our case, this was particularly important because MongoDB wouldn’t install properly without this setting. By enabling the “host” CPU type, we avoided compatibility issues (core-dump at start of MongoDB) and ensured a smoother installation and operation of MongoDB on the new UniFi server.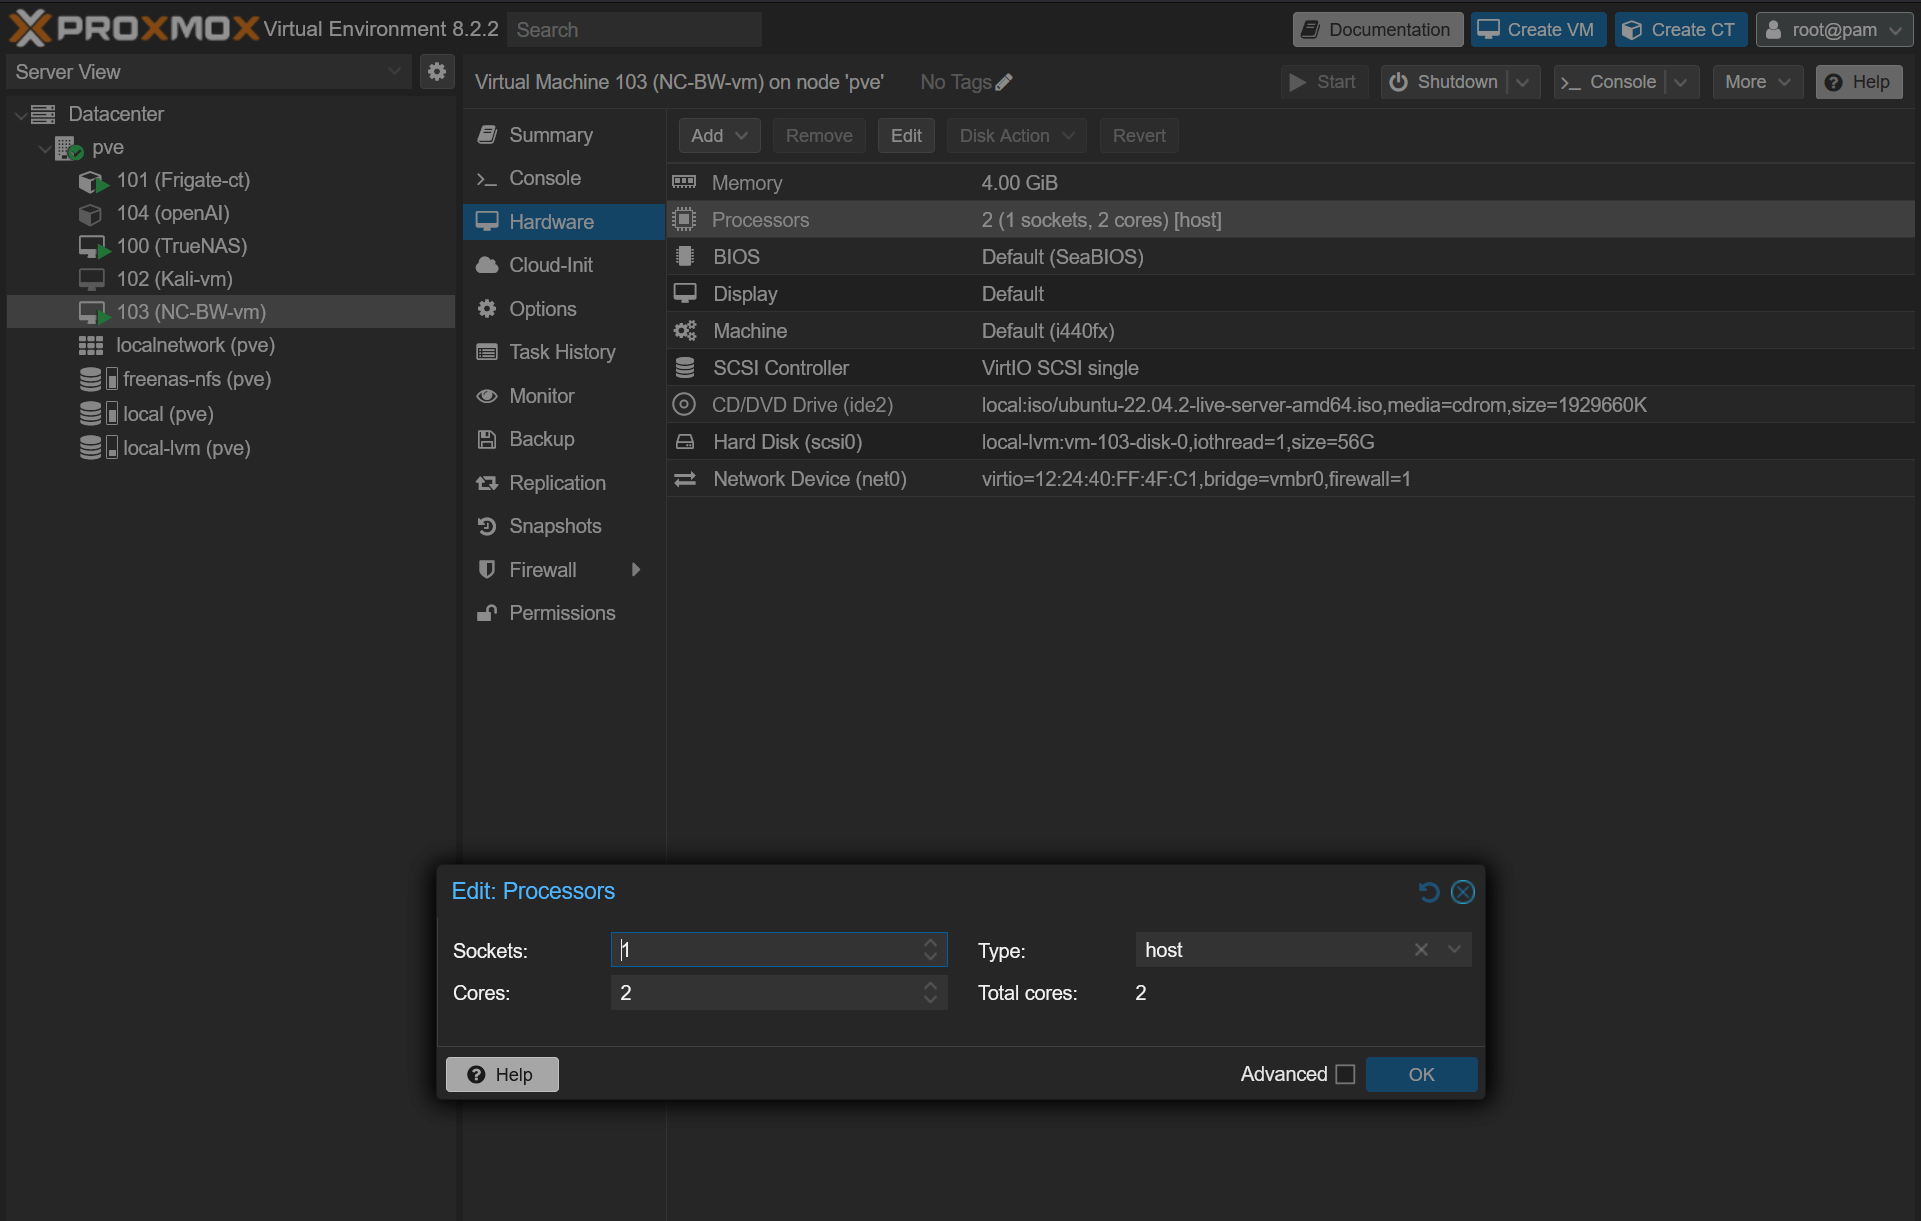
See the core-dump fault, that I received, in the code block below and which solved by setting the Proxmox VM settings of the CPU hardware type to “host” :
Bash
admin@nc-bw-vm:~$ sudo apt-get install -y mongodb-org
Reading package lists... Done
Building dependency tree... Done
Reading state information... Done
The following additional packages will be installed:
  mongodb-database-tools mongodb-mongosh mongodb-org-database mongodb-org-database-tools-extra mongodb-org-mongos
  mongodb-org-server mongodb-org-shell mongodb-org-tools
The following NEW packages will be installed:
  mongodb-database-tools mongodb-mongosh mongodb-org mongodb-org-database mongodb-org-database-tools-extra
  mongodb-org-mongos mongodb-org-server mongodb-org-shell mongodb-org-tools
0 upgraded, 9 newly installed, 0 to remove and 2 not upgraded.
Need to get 166 MB of archives.

...
..bladiebla..
...
....

Scanning linux images...

Running kernel seems to be up-to-date.

No services need to be restarted.

No containers need to be restarted.

No user sessions are running outdated binaries.

No VM guests are running outdated hypervisor (qemu) binaries on this host.
admin@nc-bw-vm:~$ sudo systemctl start mongod
admin@nc-bw-vm:~$ sudo systemctl enable mongod
Created symlink /etc/systemd/system/multi-user.target.wants/mongod.service → /lib/systemd/system/mongod.service.
admin@nc-bw-vm:~$ sudo systemctl status mongod
× mongod.service - MongoDB Database Server
     Loaded: loaded (/lib/systemd/system/mongod.service; enabled; vendor preset: enabled)
     Active: failed (Result: core-dump) since Sat 2024-06-08 20:01:29 UTC; 11s ago
       Docs: https://docs.mongodb.org/manual
   Main PID: 22637 (code=dumped, signal=ILL)
        CPU: 8ms

Jun 08 20:01:29 nc-bw-vm systemd[1]: Started MongoDB Database Server.
Jun 08 20:01:29 nc-bw-vm systemd[1]: mongod.service: Main process exited, code=dumped, status=4/ILL
Jun 08 20:01:29 nc-bw-vm systemd[1]: mongod.service: Failed with result 'core-dump'.
admin@nc-bw-vm:~$- Install a supported Linux distribution (Ubuntu 22.04 or Debian 11 recommended).
Operating System Installation
- Install the latest stable release of Ubuntu or Debian.
- Update the system:
Bash
sudo apt update && sudo apt upgrade -y- Install necessary packages:
Bash
sudo apt install ca-certificates apt-transport-https -yPrepare the New UniFi Server
Initial Setup
- Update the system:
Bash
sudo apt update && sudo apt upgrade -y- Install necessary packages:
Bash
sudo apt install ca-certificates apt-transport-https -y- Add the UniFi source list:
Bash
echo 'deb [arch=amd64] https://www.ui.com/downloads/unifi/debian stable ubiquiti' | sudo tee /etc/apt/sources.list.d/100-ubnt-unifi.list- Install the UniFi GPG key:
Bash
wget -O /etc/apt/trusted.gpg.d/unifi-repo.gpg https://dl.ui.com/unifi/unifi-repo.gpgInstall MongoDB 7.0
Bash
wget -qO - https://www.mongodb.org/static/pgp/server-7.0.asc | sudo apt-key add -

echo "deb [trusted=yes] https://repo.mongodb.org/apt/ubuntu focal/mongodb-org/7.0 multiverse" | sudo tee /etc/apt/sources.list.d/mongodb-org-7.0.list

sudo apt update

sudo apt install -y mongodb-org
Install UniFi Server
- Install UniFi:
Bash
sudo apt update && sudo apt install unifi -y- Start the UniFi service:
Bash
sudo systemctl start unifiConfigure UniFi Server Ports
Edit the /usr/lib/unifi/data/system.properties file:
This post may contain affiliate links which means I receive a commission for purchases made through links. I only recommend products that I personally use! Learn more on my private policy page.
Bash
## system.properties
#
# each unifi instance requires a set of ports:
#
## device inform
# unifi.http.port=8080
## controller UI / API
# unifi.https.port=8443
## portal redirect port for HTTP
# portal.http.port=8880
## portal redirect port for HTTPs
# portal.https.port=8843
## local-bound port for DB server
# unifi.db.port=27117
## UDP port used for STUN
# unifi.stun.port=3478
#
## the IP devices should be talking to for inform
# system_ip=a.b.c.d
## disable mongodb journaling
# unifi.db.nojournal=false
## extra mongod args
# unifi.db.extraargs
#
## HTTPS options
# unifi.https.ciphers=TLS_RSA_WITH_AES_256_CBC_SHA,TLS_RSA_WITH_AES_128_CBC_SHA
# unifi.https.sslEnabledProtocols=TLSv1,SSLv2Hello
# unifi.https.hsts=false
# unifi.https.hsts.max_age=31536000
# unifi.https.hsts.preload=false
# unifi.https.hsts.subdomain=false
#
# Ports reserved for device redirector. There is no need to open
# firewall for these ports on controller, however do NOT set
# controller to use these ports.
#
# portal.redirector.port=8881
# portal.redirector.port.wired=8882
#
# Port used for throughput measurement.
# unifi.throughput.port=6789
#
#Sun Jun 09 07:39:24 UTC 2024
unifi.http.port=7080
reporter-uuid=c0a5d428-????-429a-????-69037506757a
is_setup_completed=true
debug.device=warn
debug.mgmt=warn
unifi.https.port=7443
debug.setting_preference=auto
is_default=false
debug.system=warn
uuid=189e12dd-4c5f-????-????-a3164714c52d
debug.sdn=warn
Backup Old UniFi Server
- Access the UniFi web interface on the old server.
- Navigate to Settings > Maintenance > Backup.
- Click “Download Backup” to save the backup file.
Restore Backup to New UniFi Server
- Access the UniFi web interface on the new server.
- Navigate to Settings > Maintenance > Restore Backup.
- Upload the backup file and restore the configuration.
Firewall Rules
- Ensure the following ports are open on your firewall:
- 7080/TCP
- 7443/TCP
Bash
sudo ufw allow 7080/tcp
sudo ufw allow 7443/tcp
sudo ufw enable
sudo ufw status
Verify and Troubleshoot
- Check the status of the UniFi service:
Bash
sudo systemctl status unifi- If the service is not running, review the logs for errors:
Bash
sudo journalctl -u unifi.service- Ensure all necessary ports are open and not blocked by the firewall.
Migrating Access Points to the New UniFi Controller
To migrate an access point from the old UniFi controller to the new UniFi controller, follow these steps:
- Click on Devices in the UniFi web interface.
- Click on the access point that you want to migrate.
- Click on Settings.
- Scroll down and click on Debug.
- A terminal window will open.
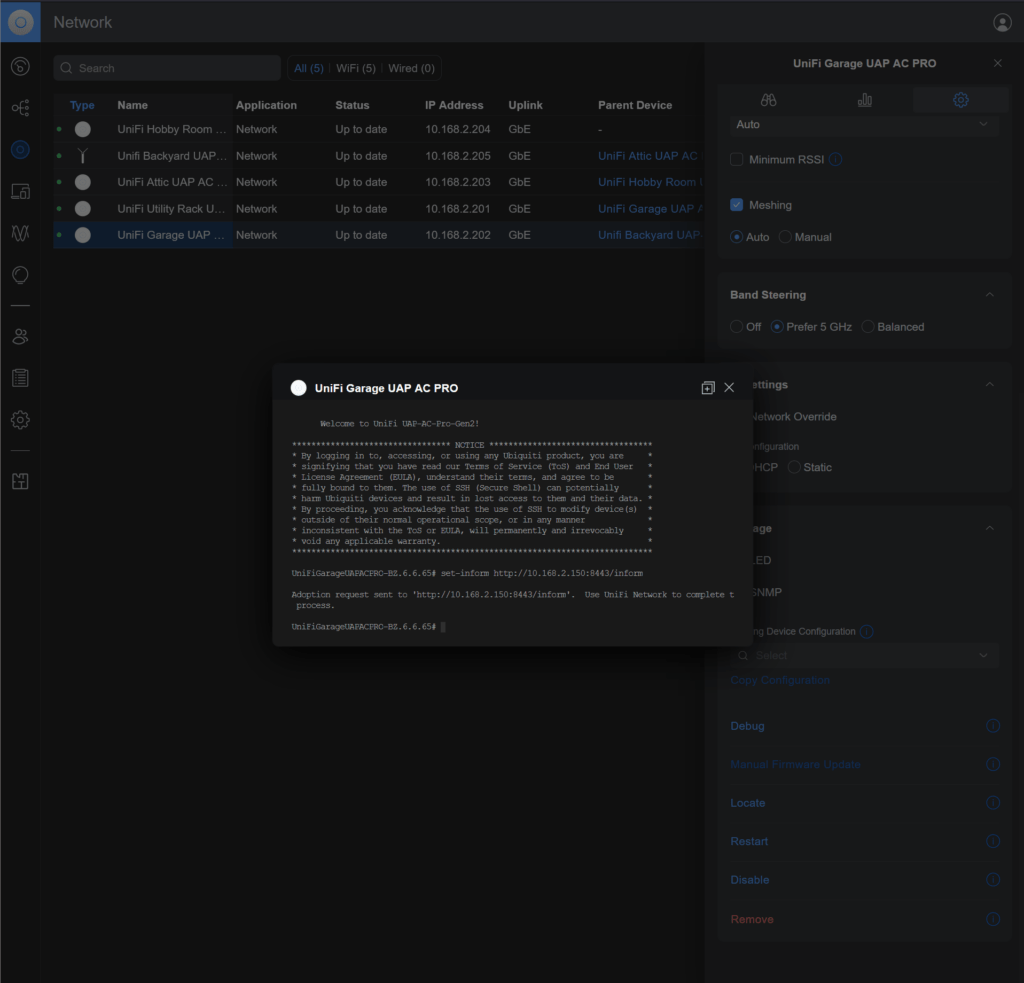
- In the terminal window, enter the command:
Bash
set-inform http://<new-controller-ip>:8080/inform- Wait for the access point to disconnect from the old server. The new server will automatically adopt it.
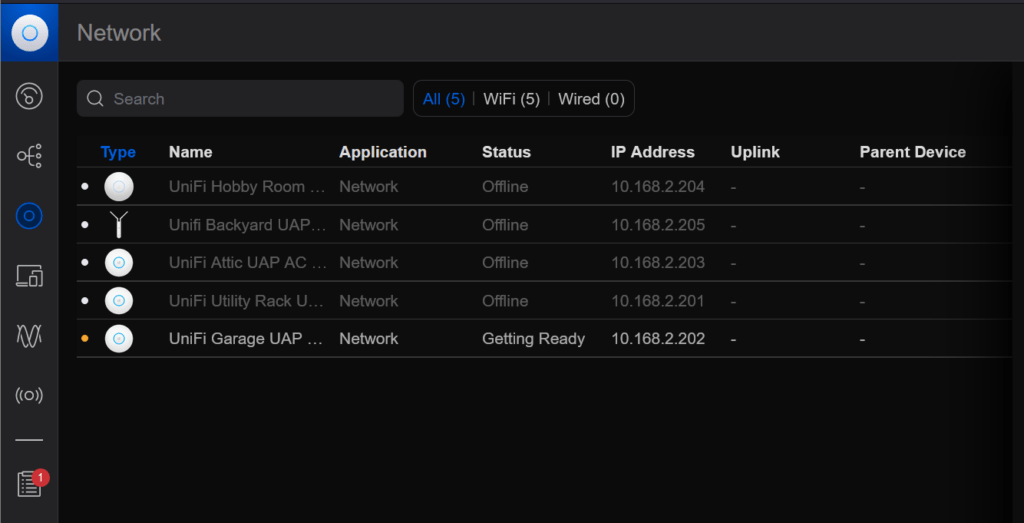
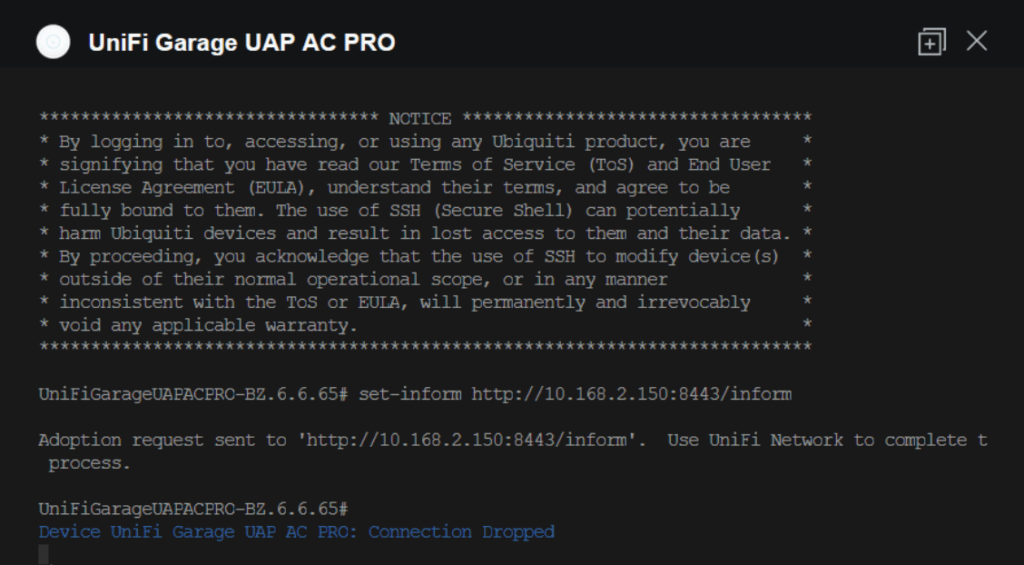
- Ensure you wait long enough for the access point to fully migrate before moving on to the next one. If you migrate them too quickly, they may revert to the old server.
Remember to replace <new-controller-ip> with the actual IP address of your new UniFi controller.
Good luck!!

Thank you very much for this!