
This guide builds on my earlier post “CPU Temp Monitoring on Proxmox” from May 18th, 2024, to show how to display CPU temperature directly in the Proxmox web interface.
First, follow the above mentioned guide for more general information on temperature monitoring on a Proxmox host.
This post may contain affiliate links which means I receive a commission for purchases made through links. I only recommend products that I personally use! Learn more on my private policy page.
I came across a helpful video on YouTube by @ProgrammingStuff22:
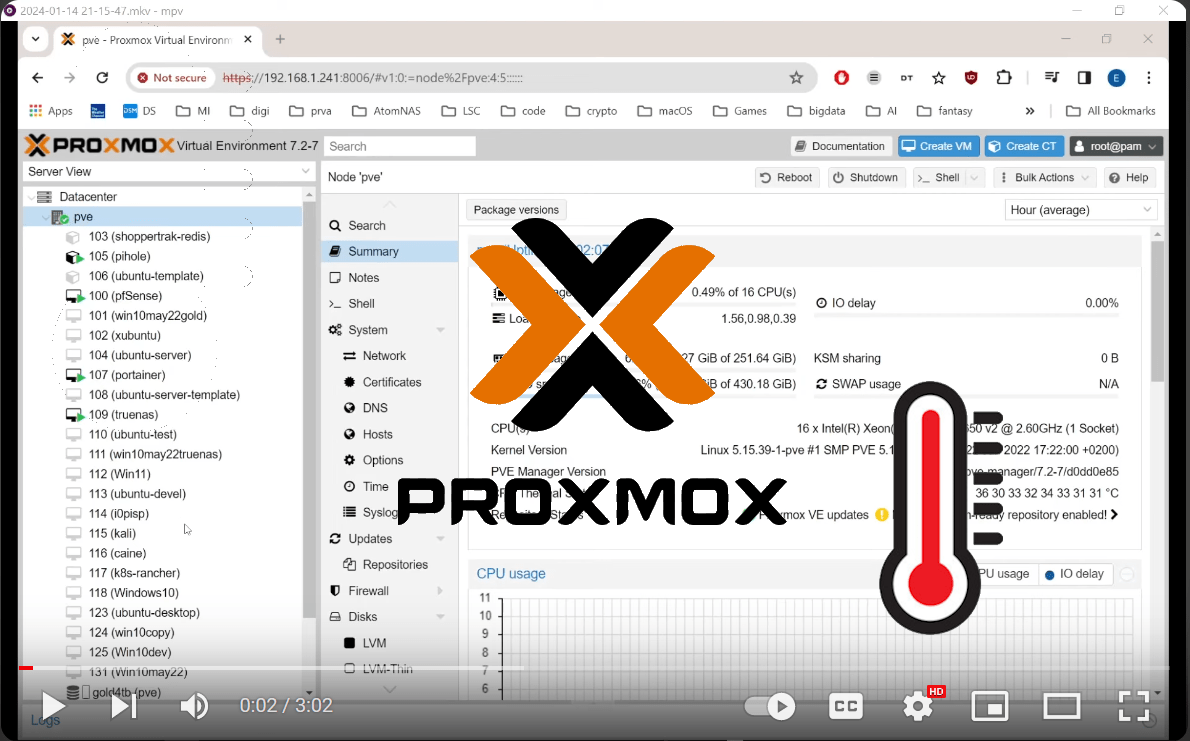
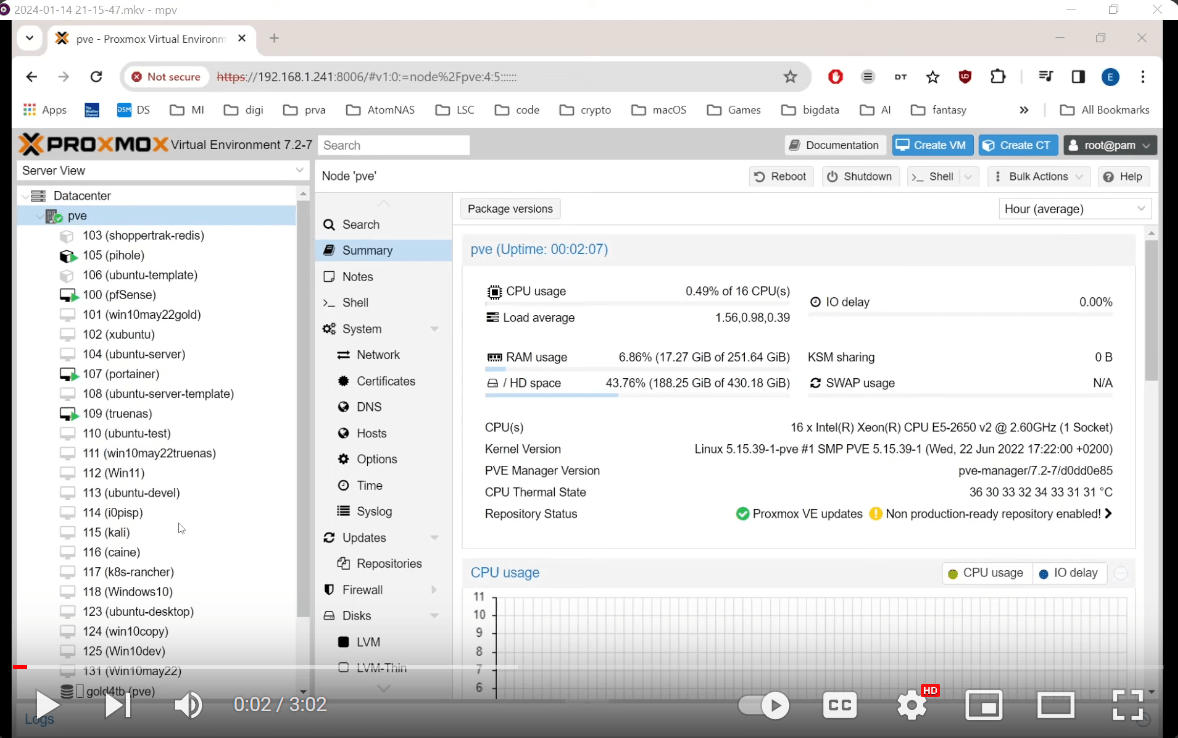
In this video the author added a CPU Thermal State line to the Proxmox PVE Summary. See below….
Thank you @ProgrammingStuff22 for the video and this brilliant idea. I’ve used the method from the video but made some adjustments to present the temperatures more nicely. To do this we have to modify some files on the Proxmox host.
Before we start:
The following plan outlines the idea how to achieve this:
- First we explain WHAT files to modify
- Then I advise you to make a backup of those files first!
- Then I will explain WHERE (at which code lines) you have to add / edit some code.
- After that we will actually modify the two files!
What files to edit/modify:
We are going to modify the following two files:
/usr/share/perl5/PVE/API2/Nodes.pm/usr/share/pve-manager/js/pvemanagerlib.js
Backup Before Editing
Backing up files is crucial because it ensures you have a copy of your data in case of accidental corruption of the system files. Before modifying system files, always create backups to prevent data loss and facilitate easy recovery if something goes wrong. This practice safeguards your work and helps maintain system stability.
Before editing these files, make sure to create backups:
sudo cp /usr/share/pve-manager/js/pvemanagerlib.js /usr/share/pve-manager/js/pvemanagerlib.js.bak
sudo cp /usr/share/perl5/PVE/API2/Nodes.pm /usr/share/perl5/PVE/API2/Nodes.pm.bak
Where to place the Code
Just READ the following part, but DON’T do it. We will do it together later on. For now, just get the idea!
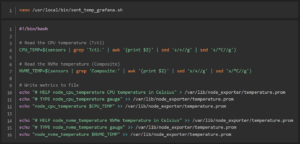
While modifying /usr/share/perl5/PVE/API2/Nodes.pm, search inside this file for “version_text" and place the following line below it:
$res->{thermalstate} = `sensors -j`;
If you use nano, press Ctrl-W to start searching text like “version_text“.
Instead of pasting the Perl codeline above, alternatively, use a more advanced version (if needed):
Why would a advanced version be needed?
Why
On my Proxmox host the output of “sensors -j” is quite a mess. Totally FOBAR-ed list of all kind of temperatures and Fan speeds.
So the output needed to be structured before it was usable to display CPU thermal data in the Proxmox web interface in a clean and consistent manner.
What This Code Does
This line of Perl code captures the output of the sensors -j command, processes it using jq, and stores the processed result in the thermalstate key of the $res hash. Here’s a breakdown:
qx{}: This is a Perl operator that executes the command inside the curly braces and returns the output.sensors -j: This command outputs sensor data in JSON format.jq: This is a command-line JSON processor. The providedjqscript extracts specific temperature readings from the JSON output and formats them into a new JSON object.- Temperature readings: The
jqscript extracts theTctl,Tccd1,Tccd2,temp1,temp2,temp3,Sensor 1, andSensor 2values. - Formatting: The temperatures are formatted to two decimal places, and any negative
temp2values are converted to positive.
That is why I filter some data using the below code:
$res->{thermalstate} = qx{sensors -j | jq '. as \$root | \$root["k10temp-pci-00c3"]["Tctl"]["temp1_input"] as \$tctl | \$root["k10temp-pci-00c3"]["Tccd1"]["temp3_input"] as \$tccd1 | \$root["k10temp-pci-00c3"]["Tccd2"]["temp4_input"] as \$tccd2 | \$root["it8792-isa-0a60"]["temp1"]["temp1_input"] as \$temp1 | \$root["it8792-isa-0a60"]["temp2"]["temp2_input"] as \$temp2 | \$root["it8792-isa-0a60"]["temp3"]["temp3_input"] as \$temp3 | \$root["nvme-pci-0100"]["Sensor 1"]["temp2_input"] as \$sensor1 | \$root["nvme-pci-0100"]["Sensor 2"]["temp3_input"] as \$sensor2 | {Tctl: \$tctl, Tccd1: \$tccd1, Tccd2: \$tccd2, temp1: \$temp1, temp2: (if \$temp2 < 0 then -\$temp2 else \$temp2 end), temp3: \$temp3, \"Sensor 1\": \$sensor1, \"Sensor 2\": \$sensor2}'};
While modifying /usr/share/pve-manager/js/pvemanagerlib.js, search (nano, Ctrl-W) for “pveversion” and place the following block below it:
{
    itemId: 'thermal',
    colspan: 2,
    printBar: false,
    title: gettext('CPU Thermal State'),
    textField: 'thermalstate',
    renderer:function(value){
        let objValue = JSON.parse(value);
        let str = '';
        str += `Tctl: ${parseFloat(objValue.Tctl).toFixed(2)}°C, `;
        str += `Tccd1: ${parseFloat(objValue.Tccd1).toFixed(2)}°C, `;
        str += `Tccd2: ${parseFloat(objValue.Tccd2).toFixed(2)}°C, `;
        str += `temp1: ${objValue.temp1}°C, `;
        str += `temp2: ${objValue.temp2}°C, `;
        str += `temp3: ${objValue.temp3}°C, `;
        str += `Sensor 1: ${objValue["Sensor 1"]}°C, `;
        str += `Sensor 2: ${objValue["Sensor 2"] !== null ? objValue["Sensor 2"] : 'N/A'}°C`;
        return str;
    }
}
What is this code doing, and what to adjust for my situation?
What This Code Does
- Defines a new UI component:
- itemId: Unique identifier for this component.
- colspan: Spans two columns in the UI layout.
- printBar: Disables the print bar for this item.
- title: Sets the title to “CPU Thermal State”.
- textField: Specifies the field that holds the thermal state data.
- Renderer function:
- This function processes the JSON data stored in
thermalstateand formats it for display in the Proxmox web interface.
- This function processes the JSON data stored in
- JSON Parsing and Formatting:
let objValue = JSON.parse(value);: Parses the JSON string into an object.- Formatting Temperatures:
Tctl,Tccd1,Tccd2: UsesparseFloat()to convert these values to floats andtoFixed(2)to ensure they always display with two decimal places.temp1,temp2,temp3,Sensor 1,Sensor 2: Directly includes these values in the formatted string.Sensor 2: Checks if it isnulland displays ‘N/A’ if so.
- Return Value:
- Constructs and returns a formatted string that includes all the temperature readings.
If your sensor output is different, you need to identify and adjust the specific sensor labels and paths in both the Perl and JavaScript code to match your system’s output.
There is a relationship between sensors -j output, perl code, and the javaScript Code
The sensors -j command outputs sensor readings in JSON format. This JSON includes various temperature readings from the CPU and other components.
The Perl code processes this JSON output to extract specific temperature values and formats them into a new JSON structure. This is done using the jq tool within a Perl command execution (qx{}).
The resulting JSON structure includes key temperature values like Tctl, Tccd1, Tccd2, temp1, temp2, temp3, Sensor 1, and Sensor 2.
# "My sensor -j" output:
{
   "k10temp-pci-00c3":{
      "Adapter": "PCI adapter",
      "Tctl":{
         "temp1_input": 62.625
      },
      "Tccd1":{
         "temp3_input": 61.500
      },
      "Tccd2":{
         "temp4_input": 55.750
      }
   },
   "acpitz-acpi-0":{
      "Adapter": "ACPI interface",
      "temp1":{
         "temp1_input": 16.800
      }
   },
   "it8792-isa-0a60":{
      "Adapter": "ISA adapter",
      "in0":{
         "in0_input": 1.788,
         "in0_min": 0.000,
         "in0_max": 2.780,
         "in0_alarm": 0.000,
         "in0_beep": 0.000
      },
      "in1":{
         "in1_input": 0.665,
         "in1_min": 0.000,
         "in1_max": 2.780,
         "in1_alarm": 0.000,
         "in1_beep": 0.000
      },
      "in2":{
         "in2_input": 0.981,
         "in2_min": 0.000,
         "in2_max": 2.780,
         "in2_alarm": 0.000,
         "in2_beep": 0.000
      },
      "+3.3V":{
         "in3_input": 3.357,
         "in3_min": 0.000,
         "in3_max": 5.559,
         "in3_alarm": 0.000,
         "in3_beep": 0.000
      },
      "in4":{
         "in4_input": 1.788,
         "in4_min": 0.000,
         "in4_max": 2.780,
         "in4_alarm": 0.000,
         "in4_beep": 0.000
      },
      "in5":{
         "in5_input": 1.177,
         "in5_min": 0.000,
         "in5_max": 2.780,
         "in5_alarm": 0.000,
         "in5_beep": 0.000
      },
      "in6":{
         "in6_input": 2.780,
         "in6_min": 0.000,
         "in6_max": 2.780,
         "in6_alarm": 1.000,
         "in6_beep": 0.000
      },
      "3VSB":{
         "in7_input": 3.357,
         "in7_min": 0.000,
         "in7_max": 5.559,
         "in7_alarm": 0.000,
         "in7_beep": 0.000
      },
      "Vbat":{
         "in8_input": 3.292
      },
      "fan1":{
         "fan1_input": 0.000,
         "fan1_min": 0.000,
         "fan1_alarm": 0.000,
         "fan1_beep": 1.000
      },
      "fan2":{
         "fan2_input": 0.000,
         "fan2_min": 0.000,
         "fan2_alarm": 0.000,
         "fan2_beep": 1.000
      },
      "fan3":{
         "fan3_input": 0.000,
         "fan3_min": 0.000,
         "fan3_alarm": 0.000,
         "fan3_beep": 1.000
      },
      "temp1":{
         "temp1_input": 48.000,
         "temp1_max": 127.000,
         "temp1_min": 127.000,
         "temp1_alarm": 0.000,
         "temp1_type": 4.000,
         "temp1_offset": 0.000,
         "temp1_beep": 1.000
      },
      "temp2":{
         "temp2_input": -55.000,
         "temp2_max": 127.000,
         "temp2_min": 127.000,
         "temp2_alarm": 0.000,
         "temp2_type": 4.000,
         "temp2_offset": 0.000,
         "temp2_beep": 1.000
      },
      "temp3":{
         "temp3_input": 47.000,
         "temp3_max": 127.000,
         "temp3_min": 127.000,
         "temp3_alarm": 0.000,
         "temp3_type": 4.000,
         "temp3_offset": 0.000,
         "temp3_beep": 1.000
      },
      "intrusion0":{
         "intrusion0_alarm": 1.000
      }
   },
   "nvme-pci-0100":{
      "Adapter": "PCI adapter",
      "Composite":{
         "temp1_input": 50.850,
         "temp1_max": 81.850,
         "temp1_min": -273.150,
         "temp1_crit": 84.850,
         "temp1_alarm": 0.000
      },
      "Sensor 1":{
         "temp2_input": 50.850,
         "temp2_max": 65261.850,
         "temp2_min": -273.150
      },
      "Sensor 2":{
         "temp3_input": 57.850,
         "temp3_max": 65261.850,
         "temp3_min": -273.150
      }
   }
}
The JavaScript code in /usr/share/pve-manager/js/pvemanagerlib.js parses the JSON structure created by the Perl script. It then formats and displays these values in the Proxmox web interface. Adjust it if your sensor -j output looks different.
Now you have the idea, let’s start editting.
Modify the first file:
After we made back-ups nothing can go wrong:
sudo nano /usr/share/perl5/PVE/API2/Nodes.pm
Search for the proper code lines and add the Perl code as shown below:
$res->{thermalstate} = qx{sensors -j | jq '. as \$root | \$root["k10temp-pci-00c3"]["Tctl"]["temp1_input"] as \$tctl | \$root["k10temp-pci-00c3"]["Tccd1"]["temp3_input"] as \$tccd1 | \$root["k10temp-pci-00c3"]["Tccd2"]["temp4_input"] as \$tccd2 | \$root["it8792-isa-0a60"]["temp1"]["temp1_input"] as \$temp1 | \$root["it8792-isa-0a60"]["temp2"]["temp2_input"] as \$temp2 | \$root["it8792-isa-0a60"]["temp3"]["temp3_input"] as \$temp3 | \$root["nvme-pci-0100"]["Sensor 1"]["temp2_input"] as \$sensor1 | \$root["nvme-pci-0100"]["Sensor 2"]["temp3_input"] as \$sensor2 | {Tctl: \$tctl, Tccd1: \$tccd1, Tccd2: \$tccd2, temp1: \$temp1, temp2: (if \$temp2 < 0 then -\$temp2 else \$temp2 end), temp3: \$temp3, \"Sensor 1\": \$sensor1, \"Sensor 2\": \$sensor2}'};
Modify the second file:
Now we change the second file:
sudo nano /usr/share/pve-manager/js/pvemanagerlib.js
Now search for the proper code lines and add the JavaScript code as shown below:
This will update the renderer function to format the temperatures with toFixed to make sure to display the desired amount of digits:
{
    itemId: 'thermal',
    colspan: 2,
    printBar: false,
    title: gettext('CPU Thermal State'),
    textField: 'thermalstate',
    renderer: function(value) {
        let objValue = JSON.parse(value);
        let str = '';
        str += `Tctl: ${parseFloat(objValue.Tctl).toFixed(2)}°C, `;
        str += `Tccd1: ${parseFloat(objValue.Tccd1).toFixed(2)}°C, `;
        str += `Tccd2: ${parseFloat(objValue.Tccd2).toFixed(2)}°C, `;
        str += `temp1: ${objValue.temp1}°C, `;
        str += `temp2: ${objValue.temp2}°C, `;
        str += `temp3: ${objValue.temp3}°C, `;
        str += `Sensor 1: ${objValue["Sensor 1"]}°C, `;
        str += `Sensor 2: ${objValue["Sensor 2"] !== null ? objValue["Sensor 2"] : 'N/A'}°C`;
        return str;
    }
}
Installation and Configuration
- Log in to the Proxmox host via SSH.
ssh your-username@your-proxmox-host- Install necessary modules:
sudo apt update
sudo apt install lm-sensors fancontrol- Detect and configure sensors:
sudo sensors-detect- Follow the prompts, answering “Yes” or “Y” to all questions.
- Load the detected sensor modules:
sudo service kmod start- Check the sensor readings:
sensors- Configure fan control if needed:
sudo pwmconfig- For additional support, load extra kernel modules by editing
/etc/modules:
sudo nano /etc/modules - Add the following lines:
it87
k10temp
nct6775- Save and reboot:
sudo reboot- Verify the configuration:
# Human readable output
sensors
# Json output
sensors -j- Here is an example of the JSON output:
jsonCode kopiëren{
    "k10temp-pci-00c3": {
        "Adapter": "PCI adapter",
        "Tctl": {"temp1_input": 62.625},
        "Tccd1": {"temp3_input": 61.500},
        "Tccd2": {"temp4_input": 55.750}
    },
    "acpitz-acpi-0": {
        "Adapter": "ACPI interface",
        "temp1": {"temp1_input": 16.800}
    },
    "it8792-isa-0a60": {
        "Adapter": "ISA adapter",
        "temp1": {"temp1_input": 48.000},
        "temp2": {"temp2_input": -55.000},
        "temp3": {"temp3_input": 47.000}
    },
    "nvme-pci-0100": {
        "Adapter": "PCI adapter",
        "Composite": {"temp1_input": 50.850},
        "Sensor 1": {"temp2_input": 50.850},
        "Sensor 2": {"temp3_input": 57.850}
    }
}
If you’ve made it this far without errors, it should work!
Done
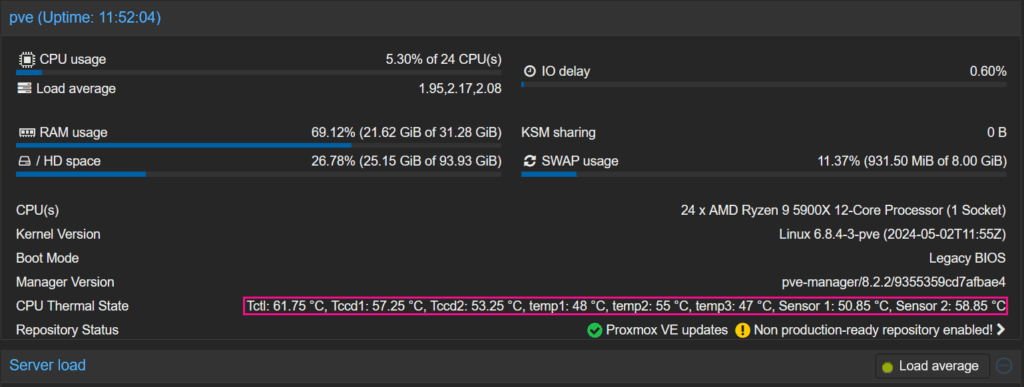
The final output in the Proxmox web interface should look like this:
Now, with this knowledge, you can of course add many other things to the Proxmox user interface. Let me know in the comments what you have added! Good luck!

I read through your ” add a CPU Thermal State line to the Proxmox PVE Summary” and just cannot seem to get it to work. I must admit my scripting skills are very limited, but I did try to follow your examples and apply my “Sensors” data.
When I update the 2 files with my version of the scripts, I get an endless “Loading” icon and it does not display any temps. It does show the “CPU Thermal State” in the summary but nothing else, the line is blank.
Can I post the scripts somewhere where you could have a look and see what I am doing wrong? That would be really appreciated.
This dit nothing for me unfortunately. I followed it exactly. In the CLI the info works just fine.