
When you’re on the go, having reliable internet access for all your devices can be a challenge, especially if you’re limited to one or two connections. That’s where a travel router can make all the difference. In this guide, inspired by NetworkChuck’s excellent video here, we’ll walk you through the process of turning your Raspberry Pi into a powerful travel router using OpenWrt. After that, we are going to boost this travel router with a 5G MiFi Router for 5G failover of the WiFi link. This is how I guarantee a good connection always against the lowest costs.
This post may contain affiliate links which means I receive a commission for purchases made through links. I only recommend products that I personally use! Learn more on my private policy page.
Step 1: Bake the Pi (Install OpenWrt)
Timestamp: 3:27
First, you’ll need to install OpenWrt on your Raspberry Pi. Download the OpenWrt image suitable for your device from the OpenWrt website.
# OpenWrt Image Download
wget https://downloads.openwrt.org/releases/22.03.5/targets/bcm27xx/bcm2711/openwrt-22.03.5-bcm27xx-bcm2711-rpi-4-squashfs-factory.img.gz
Step 2: Login to Your Pi
Timestamp: 4:54
After flashing the image, power up your Pi and log in using SSH.
ssh root@<your_pi_ip>
Step 3: OpenWrt Basic Setup
Timestamp: 6:24
Change your default password and back up your current configurations.
# Change the password
passwd

# Backup configurations
cd /etc/config
cp firewall firewall.bk
cp wireless wireless.bk
cp network network.bk
Step 4: Configure OpenWrt Network
Timestamp: 9:29
Set up your network interfaces according to your requirements. For our travel router, we will use both wired and wireless connections.
Step 5: Connect OpenWrt to WiFi
Timestamp: 14:48
Configure OpenWrt to connect to available WiFi networks. This will allow your Raspberry Pi to act as a WiFi client, connecting to public or private hotspots.
Step 6: Setup the USB Wireless Adapter
Timestamp: 20:02
Update your OpenWrt packages and install the necessary drivers for your USB wireless adapter.
# Update packages
opkg update

# Install drivers and utilities
opkg install kmod-rt2800-lib kmod-rt2800-usb kmod-rt2x00-lib kmod-rt2x00-usb kmod-usb-core kmod-usb-uhci kmod-usb-ohci kmod-usb2 usbutils openvpn-openssl luci-app-openvpn nano
Step 7: Wireless Network Setup
Timestamp: 21:59
Configure your wireless network settings for the travel router.
Step 8: VPN Setup (with NordVPN)
Timestamp: 24:16
Secure your internet connection by setting up a VPN. Download the NordVPN client file for the server you’d like to use and upload it to your Raspberry Pi.
# Upload your config file
scp your_file_name_here root@<your_pi_ip>:/etc/openvpn/client.conf
You can also use WinSCP for the above action if you find this more convenient. After that, configure the VPN client.
Enhanced Setup with Failover and MiFi Router
I’ve taken NetworkChuck’s setup a step further by integrating a ZTE MU5001 MiFi router, providing a robust failover mechanism. If the primary WiFi connection drops, the travel router will automatically switch to the 5G connection provided by the MiFi router. This setup ensures continuous internet access, which is particularly useful in scenarios like camping, where WiFi can be unreliable.
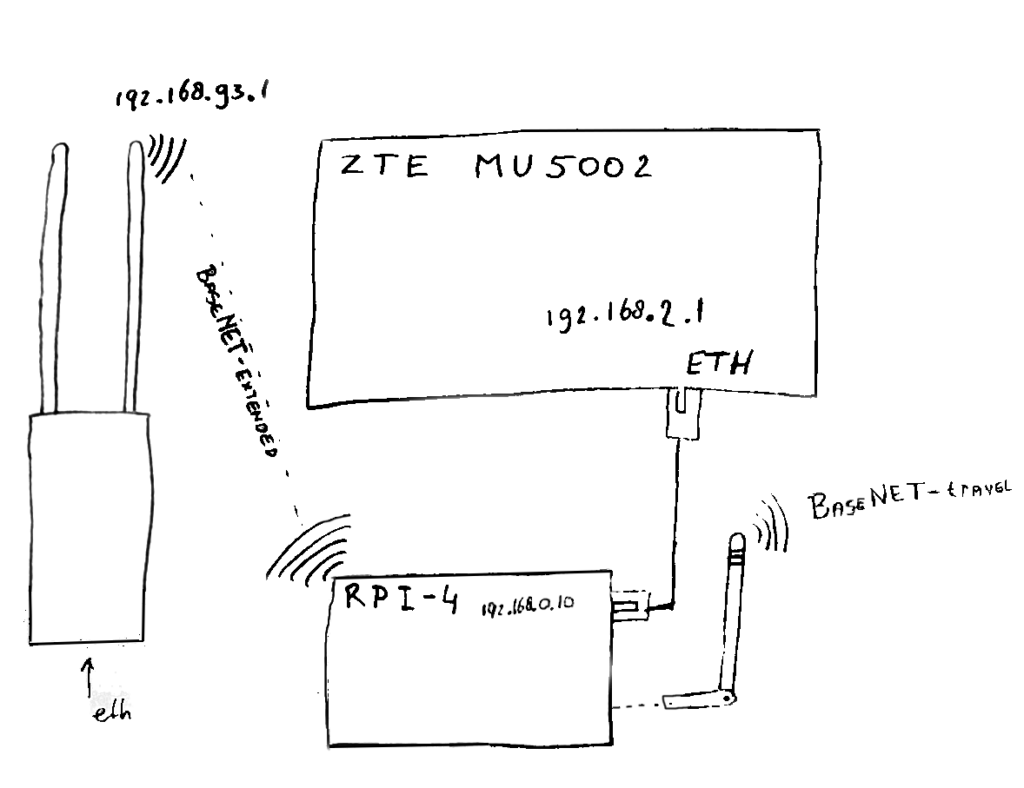
My Travel Router Setup
The diagram illustrates the setup of a Raspberry Pi 4 configured as a travel router, integrated with a ZTE MU5002 5G mobile (MiFi) router and a secondary antenna for extended network coverage. Here’s a detailed breakdown of the components and their connections:
- 5G ZTE MU5002 Router
This is a marvelous router. It is super user friendly and FAST!! The ZTE MU5002 5G portable router is an incredible device that provides lightning-fast internet speeds of up to 3.8 Gbps, making it perfect for use on the go. It can connect up to 32 devices simultaneously, ensuring you and your friends or family stay connected wherever you are. With its 4500 mAh battery, compact design, and easy-to-use 2.4″ touchscreen, the ZTE MU5002 is the ideal solution for travelers, remote workers, and anyone in need of reliable internet access. Buy it (ZTE MU5002) on Amazone, or by its successor, the ZTE MU5120.


- Raspberry Pi 4 (RPI-4):
- IP Address: 192.168.0.10
- Ethernet Connection: Connected to the ZTE MU5002 router.
- WiFi Networks: The Raspberry Pi 4 connects to two WiFi networks:
- BaseNET-extended: A WiFi network provided by a secondary antenna, possibly for extended range or backup purposes.
- BaseNET-travel: The WiFi network created by the Raspberry Pi 4 for other devices to connect to. Choose a good working external Wifi Adapter using USB. Most of them won’t work, this one does work (Ralink WiFi dongle with RT5370 chipset).
- Campsite Network Router:
- IP Address: 192.168.93.1
- Function: Provides the “BaseNET-extended” network.
- Connection: Communicates wirelessly with the Raspberry Pi 4 to provide delicious internet.
- Network Connections:
- The ethernet (ETH) connection ensures a stable wired connection between the ZTE MU5002 MiFI router and the Raspberry Pi 4.
- The “BaseNET-extended” This is the campsite WiFi network, showing the wireless connection between the Camping/Campsite and the Raspberry Pi 4.
- The BaseNET-travel WiFi network is shown with another dashed line, indicating the wireless network created by the Raspberry Pi 4 for other devices.
This setup allows the Raspberry Pi 4 to act as a travel router, leveraging the 5G backup connection from the ZTE MU5002 while providing local network connectivity through its own WiFi network (BaseNET-travel). This configuration ensures robust internet access even when the primary Campsite WiFi (BaseNET-extended) is out of range or unavailable.
Example config
config wifi-device 'radio0'
	option type 'mac80211'
	option hwmode '11ac'
	option path 'platform/soc/fe300000.mmcnr/mmc_host/mmc1/mmc1:0001/mmc1:0001:1'
	option htmode 'HT40'
	option disabled '0'
	option short_gi_40 '1'
	option cell_density '0'

config wifi-iface 'wifinet1'
	option device 'radio0'
	option mode 'sta'
	option network 'wwan'
	option ssid 'BaseNET-extended'
	option encryption 'psk2'
	option key 'lifetec7000'

config wifi-device 'radio1'
	option type 'mac80211'
	option hwmode '11n'
	option path 'scb/fd500000.pcie/pci0000:00/0000:00:00.0/0000:01:00.0/usb1/1-1/1-1.3/1-1.3:1.0'
	option channel 'auto'
	option htmode 'HT40'
	option disabled '0'
	option cell_density '1'

config wifi-iface 'default_radio1'
	option device 'radio1'
	option network 'lan'
	option mode 'ap'
	option ssid 'BaseNET-travel'
	option encryption 'psk2'
	option key 'lifetec7000'
	option wmm '1'
VPN Setup Commands
# Install packages
opkg update
opkg install luci-app-openvpn
/etc/init.d/rpcd restart

# Configuration parameters
OVPN_DIR="/etc/openvpn"
OVPN_ID="vanguard-pfsense-UDP4-1194-Pieter-sluijsjes-nl"
OVPN_USER="*******"
OVPN_PASS="*******"

# Save username/password credentials
umask go=
cat << EOF >${OVPN_DIR}/${OVPN_ID}.auth
${OVPN_USER}
${OVPN_PASS}
EOF

# Configure VPN service
sed -i -e "
/^auth-user-pass/s/^/#/
/redirect-gateway/s/^/#/
\$a auth-user-pass ${OVPN_ID}.auth
\$a redirect-gateway def1 ipv6
" ${OVPN_DIR}/${OVPN_ID}.conf
/etc/init.d/openvpn restart

# Provide VPN instance management
ls /etc/openvpn/*.conf \
| while read -r OVPN_CONF
do
OVPN_ID="$(basename ${OVPN_CONF%.*} | sed -e "s/\W/_/g")"
uci -q delete openvpn.${OVPN_ID}
uci set openvpn.${OVPN_ID}="openvpn"
uci set openvpn.${OVPN_ID}.enabled="1"
uci set openvpn.${OVPN_ID}.config="${OVPN_CONF}"
done
uci commit openvpn
/etc/init.d/openvpn restart

# Configure firewall
uci rename firewall.@zone[0]="lan"
uci rename firewall.@zone[1]="wan"
uci del_list firewall.wan.device="tun+"
uci add_list firewall.wan.device="tun+"
uci commit firewall
/etc/init.d/firewall restart

# Configure hotplug
mkdir -p /etc/hotplug.d/online
cat << EOF > /etc/hotplug.d/online/00-openvpn
/etc/init.d/openvpn restart
EOF
cat << EOF >> /etc/sysupgrade.conf
/etc/hotplug.d/online/00-openvpn
EOF
Let’s manually outline the steps based on the provided configuration details for setting up a route to the MiFi router and configuring failover functionality.
Adding Route to Access MiFi Router on 192.168.2.1
To configure your Raspberry Pi travel router to ensure the MiFi router at IP address 192.168.2.1 is accessible, you need to add a static route. Here’s how to do it:
- Log in to your Raspberry Pi’s OpenWRT interface.
- Navigate to Network -> Static Routes.
- Add a new route with the following settings:
- Interface:
lan - Route Type:
unicast - Target:
192.168.2.1/32 - Gateway:
192.168.2.1
- Interface:
- Save and Apply the configuration.
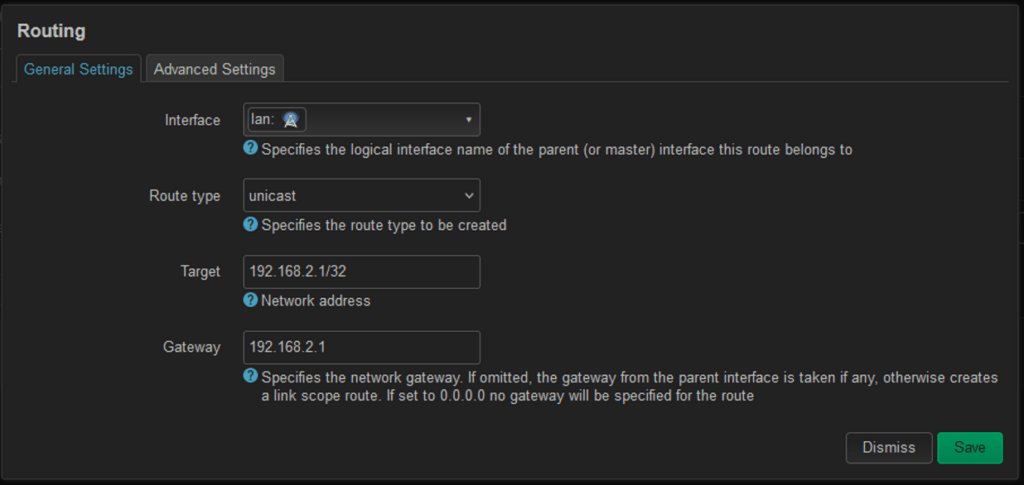
This configuration ensures that any traffic destined for 192.168.2.1 will be routed correctly through the network, allowing access to the MiFi router.
Configuring Failover Functionality
To ensure a failover mechanism so that the Raspberry Pi switches to a backup connection if the primary connection fails, you can use the mwan3 package in OpenWRT. Here’s how to set it up:
- Install the
mwan3package:bashCode kopiërenopkg update opkg install mwan3 luci-app-mwan3 - Configure Interfaces:
- Go to Network -> Interfaces.
- Define your primary and secondary interfaces, for example:
wan(primary connection, e.g., Ethernet)wan2(secondary connection, e.g., WiFi)
- Configure mwan3:
- Go to Network -> Load Balancing.
- Add member interfaces:
- Primary Interface (wan):
- Interface:
wan - Metric:
1 - Weight:
1
- Interface:
- Secondary Interface (wan2):
- Interface:
wan2 - Metric:
2 - Weight:
1
- Interface:
- Primary Interface (wan):
- Configure Policies:
- Define a policy that uses both interfaces:
- Balanced:
wan(metric 1)wan2(metric 2)
- Balanced:
- Define a failover policy:
- Failover:
wan(metric 1)wan2(metric 2)
- Failover:
- Define a policy that uses both interfaces:
- Configure Rules:
- Create rules to apply the failover policy:
- Default rule:
- Use the
Failoverpolicy.
- Use the
- Default rule:
- Create rules to apply the failover policy:
- Save and Apply the configuration.
Example Configuration Snippet
Add the following configuration snippets to your /etc/config/mwan3 file:
bashCode kopiërenconfig interface 'wan'
    option enabled '1'
    list track_ip '8.8.8.8'
    list track_ip '8.8.4.4'
    option reliability '1'
    option count '1'
    option timeout '2'
    option interval '5'
    option down '3'
    option up '8'

config interface 'wan2'
    option enabled '1'
    list track_ip '8.8.8.8'
    list track_ip '8.8.4.4'
    option reliability '1'
    option count '1'
    option timeout '2'
    option interval '5'
    option down '3'
    option up '8'

config member 'wan_m1_w1'
    option interface 'wan'
    option metric '1'
    option weight '1'

config member 'wan2_m2_w1'
    option interface 'wan2'
    option metric '2'
    option weight '1'

config policy 'balanced'
    list use_member 'wan_m1_w1'
    list use_member 'wan2_m2_w1'

config policy 'failover'
    list use_member 'wan_m1_w1'
    list use_member 'wan2_m2_w1'

config rule 'default_rule'
    option dest_ip '0.0.0.0/0'
    option use_policy 'failover'
This setup ensures that your Raspberry Pi travel router will attempt to use the primary connection (wan), and if it fails, it will automatically switch to the secondary connection (wan2), ensuring continuous connectivity.
By integrating these configurations, you enhance your travel router’s reliability and functionality, ensuring it can handle various network conditions efficiently.
With this setup, you can enjoy seamless and secure internet connectivity for all your devices during your travels. Don’t forget to give kudos to NetworkChuck for his awesome guide that inspired this setup.